type
Post
status
Published
date
Jan 5, 2021
slug
2021/01/05/1609810735378
summary
巧用 Github Action 编译跨平台 docker 镜像
tags
Docker
Github
category
Docker
created days
new update day
icon
password
Created_time
Dec 5, 2022 09:35 AM
Last edited time
Mar 1, 2025 01:50 AM
巧用 Github Action 编译跨平台 docker 镜像
大家都知道
docker 以其灵活的运用方式以及其部署的快速性广受大家的喜爱,也许大家在使用 docker 部署服务的时候有可能跟我一样注意到在 Docker Hub 上有着好多镜像在它的 Tag 界面下面有着好多运行平台,我当时就察觉到这可能就是 docker 之所以能够实现跨平台运行的关键所在了,于是我就试着在我的树莓派3B+(运行64位的 Arch Linux arm )上试着pull一下自己制作的镜像,毫无疑问尝试失败了。这可就让我犯了难,为什么官方镜像可以实现跨平台无缝使用,而我自己构建的就不可以呢?问题出现在这里:我们可以看到 docker 的官方镜像上基本上都有着各种运行平台的标签,可能这就是它能够在各种平台上运行的一种体现。
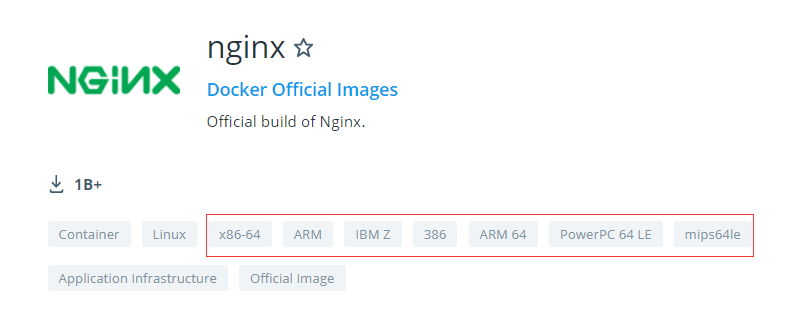
让我们转到 nginx 镜像的
TAG 界面,我们可以看到与我们自己所构建的镜像不同它的一个标签清单中含有多个隶属于不同平台的镜像,当你在使用不同平台时,它会按平台为你分发镜像这应该就是它能实现跨平台的真正原因。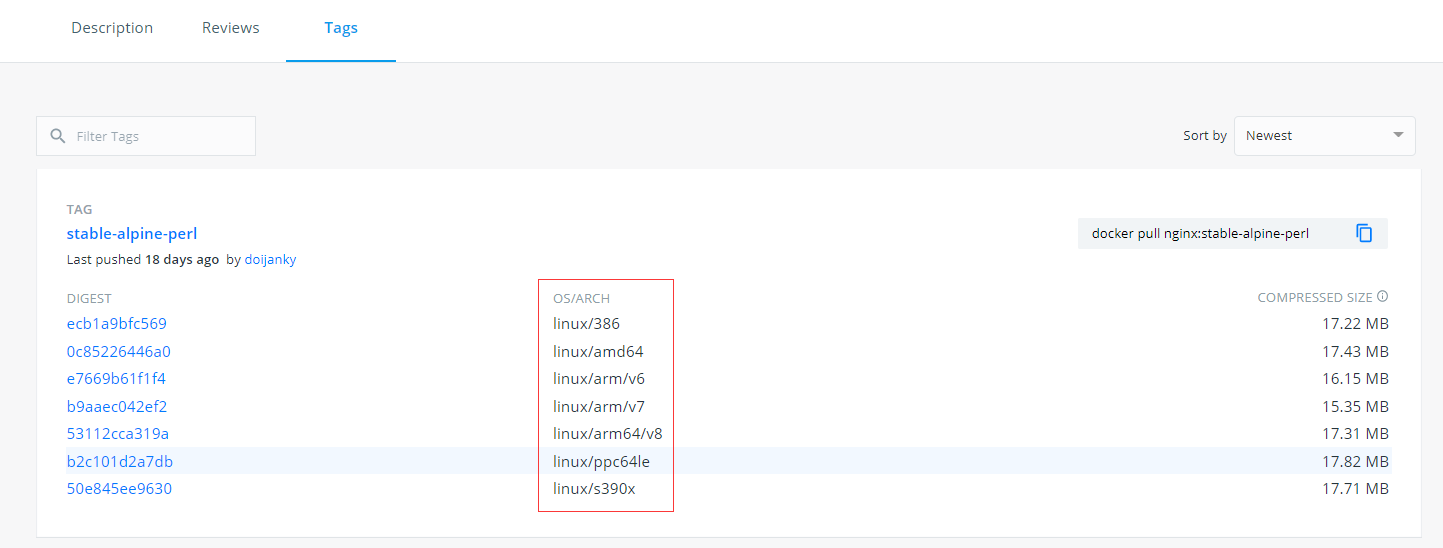
手动构建自己的跨平台镜像
好了找到了问题所在,下面我们需要做的就是想办法实现它,有两种实现方式:一种是自己手动使用
docker buildx 套件构建,然后创建清单并推送至 Docker Hub(不过鉴于国内的国际互联网状态、说实话我还没有真正的成功过一次,所以在这里只做原理性叙述,有兴趣的可以尝试一下),第二种是使用 Github Action 自动完成构建并推送的任务(推荐这种方式、效率高还省心)。手动构建并推送
1. 开启 docker 的 experimental feature(实验特性)
你没有看错 docker 的镜像清单功能目前还被其定义为实验特性(虽然已经不知道被投入使用多长时间了),在
macOS 和 Windows 上只需要按序打开 Preferences > Command Line 然后开启它就行,Linux 相对麻烦一点,需要修改配置文件 /etc/docker/daemon.json 或者 ~/.docker/config.json ,添加 "experimental": true 字段,然后重启 docker 服务(sudo systemctl restart docker)。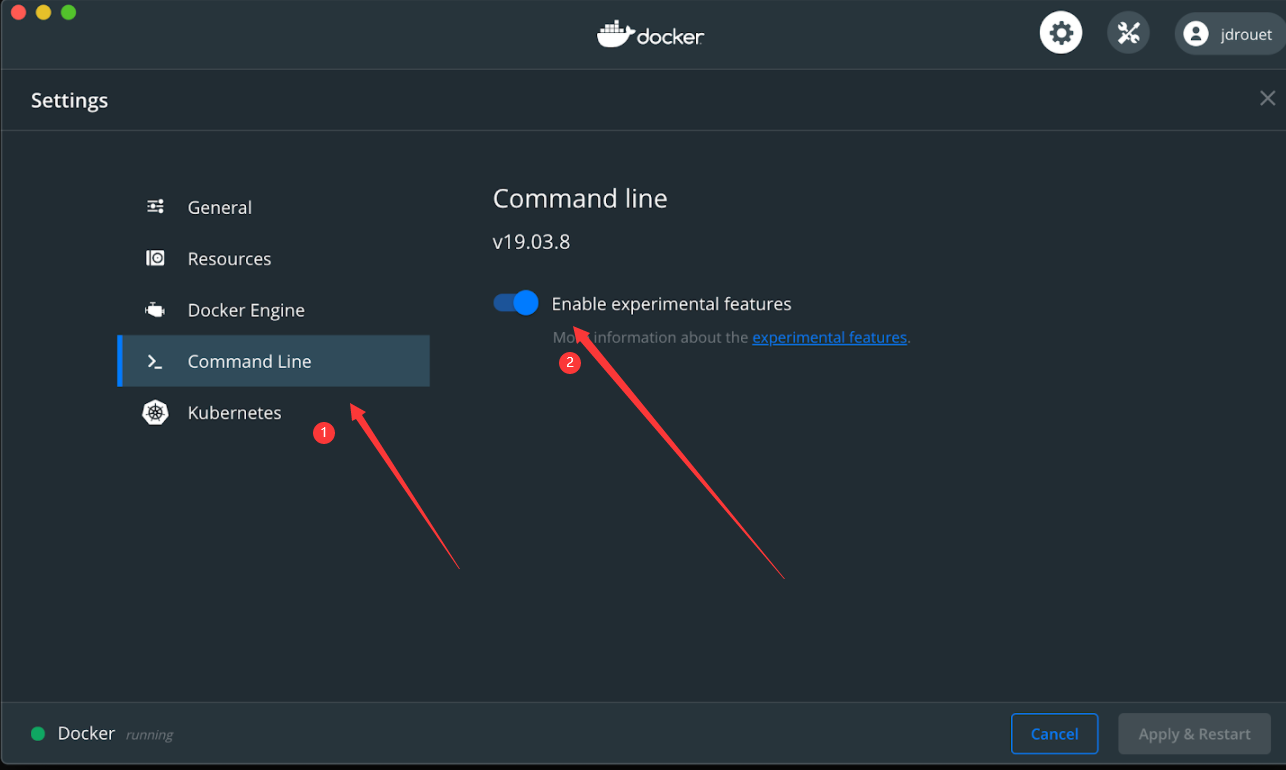
2. 开始多平台构建尝试
有两种构建 Docker 平台镜像的方法:即
docker manifest和 docker buildx。两者的区别就是
docker manifest 较为底层和繁琐,docker buildx相对便捷。docker manifest 方式
使用这种方式,需要对每种运行平台进行单独构建,并相应的打上标签,然后逐个的将其推送至
Docker Hub (注意在这里你需要将你构建好的镜像推送到 Docker Hub,否则创建清单会失败)。然后,我们就可以将所有镜像合并到一个标签引用的清单中。- 按平台构建镜像
# AMD64
$ docker build -t your-username/multiarch-example:manifest-amd64 --build-arg ARCH=amd64/ .
$ docker push your-username/multiarch-example:manifest-amd64

# ARM32V7
$ docker build -t your-username/multiarch-example:manifest-arm32v7 --build-arg ARCH=arm32v7/ .
$ docker push your-username/multiarch-example:manifest-arm32v7

# ARM64V8
$ docker build -t your-username/multiarch-example:manifest-arm64v8 --build-arg ARCH=arm64v8/ .
$ docker push your-username/multiarch-example:manifest-arm64v8
- 创建清单
$ docker manifest create \\
your-username/multiarch-example:manifest-latest \\
--amend your-username/multiarch-example:manifest-amd64 \\
--amend your-username/multiarch-example:manifest-arm32v7 \\
--amend your-username/multiarch-example:manifest-arm64v8
- 推到
Docker Hub
$ docker manifest push your-username/multiarch-example:manifest-latest
- 检查成果
最后你应该可以在
Docker Hub 上看到类似内容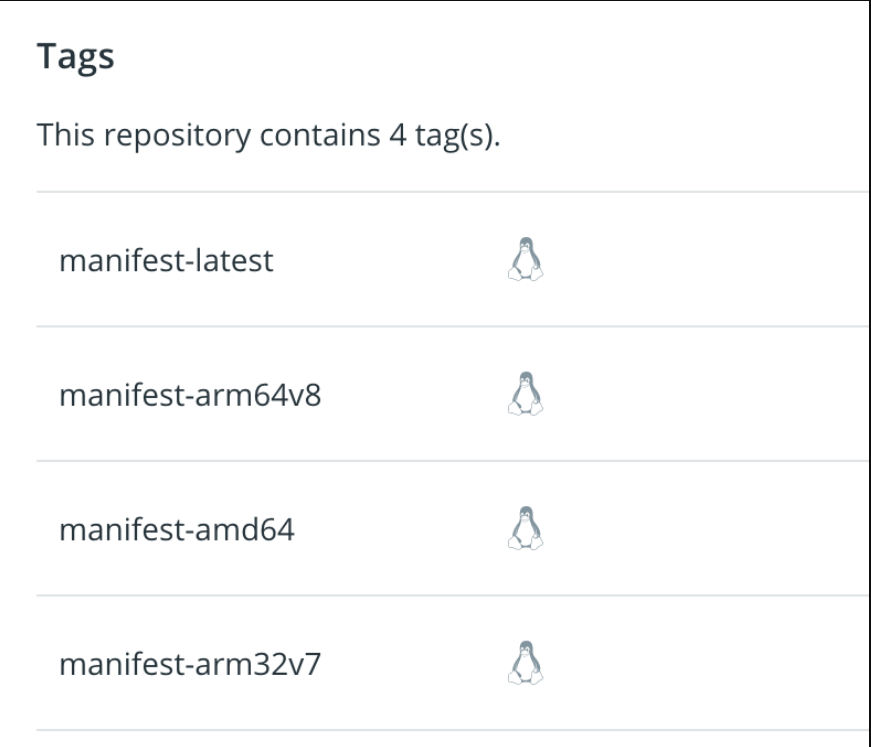
使用 docker buildx
如果您使用的是Mac或Windows,则无需担心,Docker Desktop附带了buildx。如果您使用的是Linux,则可能需要按照此处的文档进行安装 https://github.com/docker/buildx
使用
docker buildx 实现与上面一致的功能,只需要简单的运行下面的命令$ docker buildx build \\ --push \\ --platform linux/arm/v7,linux/arm64/v8,linux/amd64 \\ --tag your-username/multiarch-example:buildx-latest .
最终结果类似于这样

使用 Github Action 自动构建
好了、现在我们原理也整明白了,步骤也清楚了、可以向
Github Action 进军,解放我们的双手了(国内网络环境确实很头疼)。1. 在你的 Docker Hub 账户新建一个 Token
为了实现自动推送镜像,需要给
Github Action 授予一个 Token你可以在账户设置里面找到它
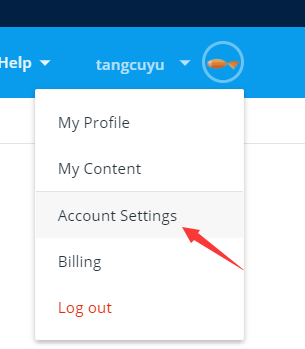
注意!该Token只显示一次,请妥善保管好

2. 在你的项目设置里面添加两个环境变量
名称分别为
DOCKERHUB_TOKEN DOCKERHUB_USERNAME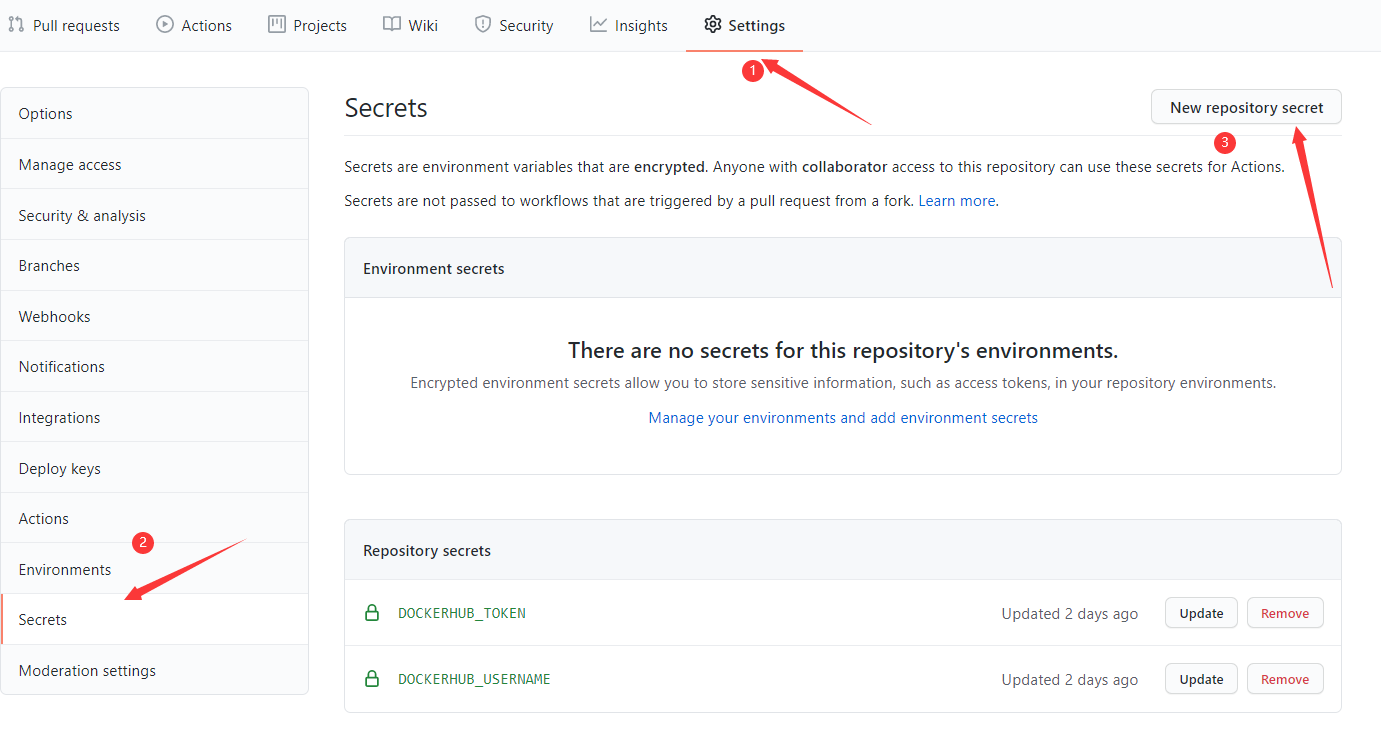
3. 在你的Github repo里新建一个 Action
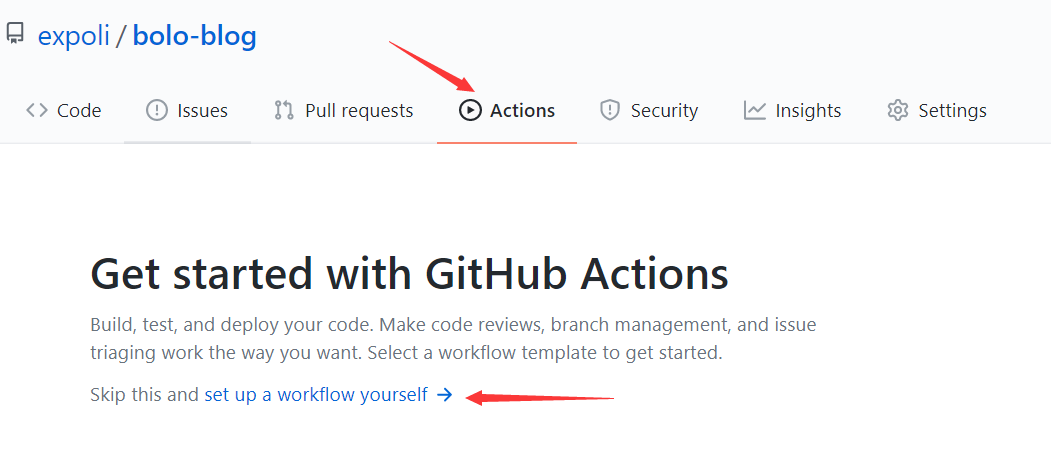
- 根据需要相应修改配置文件
# This is a basic workflow to help you get started with Actions

name: CI

# Controls when the action will run.
on:
  # 任意推送都会触发构建
  push:
# 定时调度
  schedule:
    - cron: "0 0 * * 1"

  # Allows you to run this workflow manually from the Actions tab
# 可以手动触发
  workflow_dispatch:
    inputs:
      logLevel:
        description: 'Log level'
        required: true
        default: 'warning'
      tags:
        description: 'Test scenario tags'

jobs:
  buildx:
    runs-on: ubuntu-latest
    steps:
      -
        name: Checkout
        uses: actions/checkout@v2
      - name: Get current date
        id: date
        run: echo "::set-output name=today::$(date +'%Y-%m-%d')"
      -
        name: Set up QEMU
        uses: docker/setup-qemu-action@v1
      -
        name: Set up Docker Buildx
        id: buildx
        uses: docker/setup-buildx-action@v1
      -
        name: Available platforms
        run: echo ${{ steps.buildx.outputs.platforms }}
      -
        name: Login to DockerHub
        uses: docker/login-action@v1
        with:
          username: ${{ secrets.DOCKERHUB_USERNAME }}
          password: ${{ secrets.DOCKERHUB_TOKEN }}
      -
        name: Build and push
        uses: docker/build-push-action@v2
        with:
          context: .
          file: ./Dockerfile
# 所需要的体系结构,可以在 Available platforms 步骤中获取所有的可用架构
          platforms: linux/amd64,linux/arm64/v8
# 镜像推送时间
          push: ${{ github.event_name != 'pull_request' }}
# 给清单打上多个标签
          tags: |
            user/app:latest
            user/app:${{ steps.date.outputs.today }}
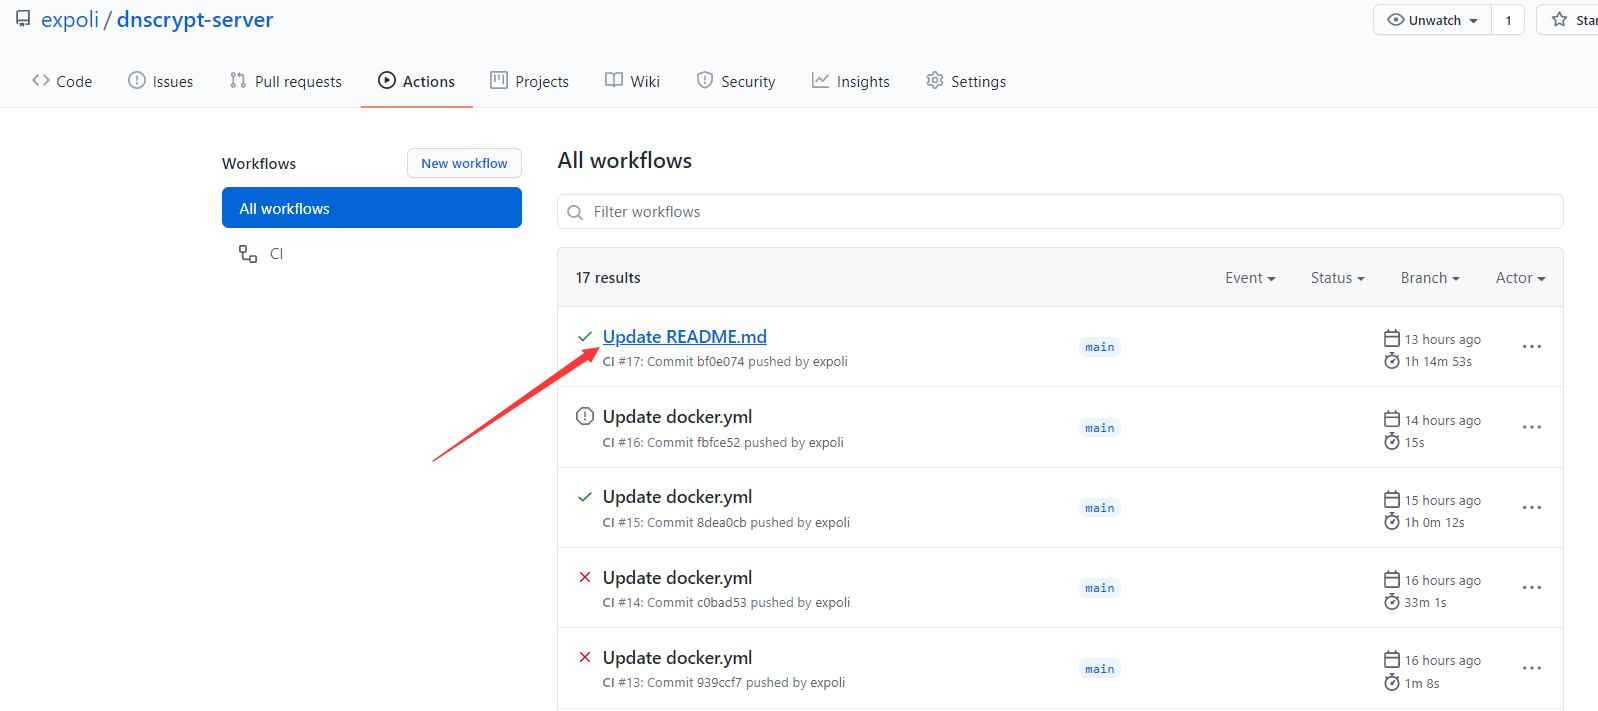
4. 查看构建结果并排错
有时候不可能一下就成功,当构建出错的时候,耐心查看日志,并进行修改。点击相应的构建可查看详细运行日志。
欢迎加入“喵星计算机技术研究院”,原创技术文章第一时间推送。

- 作者:tangcuyu
- 链接:https://expoli.tech/articles/2021/01/05/1609810735378
- 声明:本文采用 CC BY-NC-SA 4.0 许可协议,转载请注明出处。
相关文章

